
In this blog post, I'll show you how to install and configure the NginX web server and reverse proxy server on Ubuntu Server 20.04 LTS. You'll learn how to reverse proxy to backend servers on the local network and how to set up multiple subdomains with SSL/TLS encryption. Enjoy!
What is a Reverse Proxy?
Have you ever wanted to host another website or service on the internet, but you've already used ports 80 and 443? If so, you'd probably forward another port (such as 8080) and host the service on that port. On the surface, this doesn't seem like a bad idea, but it actually is. Opening up multiple ports on your network can provide attackers with a larger attack vector for your network, which can be very dangerous. Also, using a port other than 443 for https causes browsers to automatically reject the certificate, which can be very annoying to users.
Well, a reverse proxy solves these problems by allowing you to host multiple websites/services without opening any additional ports. It does this by allowing you to route a second website to a subdomain and handling the requests using a backend server on your local network. Another reason to use a reverse proxy is that it can perform all TLS encryption, reducing the load on the web servers.
Prerequisites
There are a few things you need to have before setting up a reverse proxy. These prerequisites include a web server accessible on the internet (with ports 80 and 443), a domain name, and some existing websites/services on your local network that we can proxy.
Why NginX?
There are many different options when it comes to reverse proxying software (Apache, Caddy, Traefik, etc.), but I chose NginX because it's a fairly lightweight, easy to configure server that offers relatively high performance.
Installing NginX
To install NginX, type the following commands as root or with "sudo":
# apt update
# apt install nginx
After installation, make sure ports 80 and 443 are allowed through the firewall by typing the following:
# ufw allow 80/tcp
# ufw allow 443/tcp
If you navigate to your server's ip address, you should now see the default NginX webpage. This means that NginX is working properly
Creating the Reverse Proxy Structure
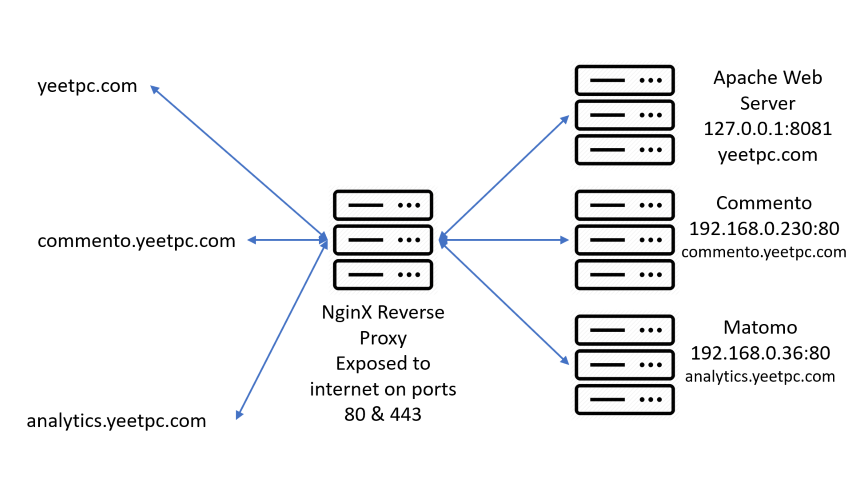
Before we go and modify the config files, we have to decide on the structure for the reverse proxy (what backend servers will serve each subdomain). I decided to have my www and non-www domain (yeetpc.com) proxied to localhost port 8081. I also decided to have two subdomains, analytics.yeetpc.com and commento.yeetpc.com, proxied to 192.168.0.230 port 80 and 192.168.0.36 port 80, respectively, as you can see in the diagram below.
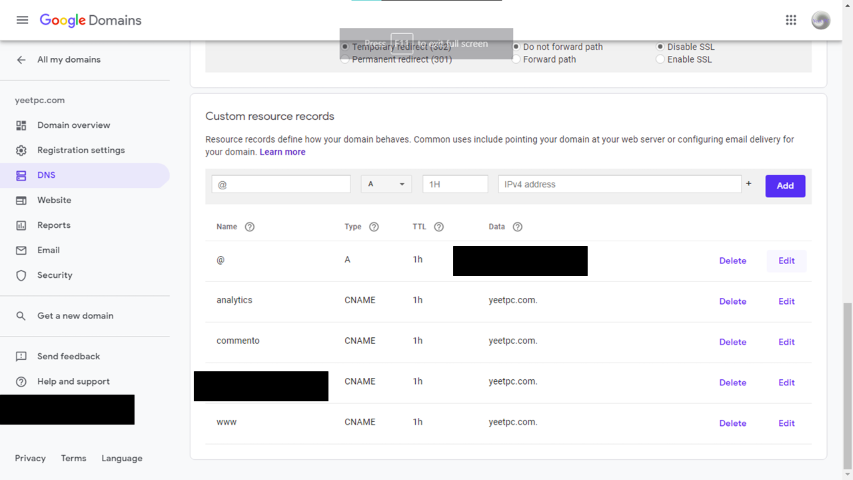
You also need to make sure that all of your subdomains have DNS CNAME records that point to your domain name. Below is an example in Google Domains, but it may vary depending on your DNS provider.
Modifying the Configuration
NOTE: Templates for all the config files in this post & the video can be found at this GitHub repo.
Removing the Default Configuration
Now, we need to remove the default site and add our reverse proxy configuration. To do this, we enter the /etc/nginx/sites-enabled/ directory and remove the default configuration file using the commands below:
# cd /etc/nginx/sites-enabled/
# ls
default
# rm default
Adding the First Config File
To begin, we can create a file in the /etc/nginx/sites-available/ directory called reverse-proxy.conf. This file will serve a few purposes: redirecting yeetpc.com to www.yeetpc.com, redirecting http to https, and reverse proxying to port 8081 on localhost.
The first thing we add in this file is a server block, which will listen on www.yeetpc.com port 80 and redirect visitors to https (port 443).
server {
    listen 80;
    server_name www.yeetpc.com;
    return 301 https://www.yeetpc.com$request_uri;
}
The next thing to add is another server block, which will listen on yeetpc.com port 80 and redirect visitors to www.yeetpc.com with https.
server {
    listen 80;
    server_name yeetpc.com;
    return 301 https://www.yeetpc.com$request_uri;
}
Our third server block will listen on yeetpc.com port 443, and redirect the https traffic to www.yeetpc.com. This server block also contains information about the SSL certificates, which we will modify later when we obtain them.
server {
    listen 443;
    server_name yeetpc.com;
    return 301 https://www.yeetpc.com$request_uri;

    # SSL Configuration

    ssl_certificate /etc/letsencrypt/live/yeetpc.com/fullchain.pem; # managed by Certbot
    ssl_certificate_key /etc/letsencrypt/live/yeetpc.com/privkey.pem; # managed by Certbot
    ssl on;
    ssl_session_cache  builtin:1000  shared:SSL:10m;
    ssl_protocols  TLSv1 TLSv1.1 TLSv1.2;
    ssl_ciphers HIGH:!aNULL:!eNULL:!EXPORT:!CAMELLIA:!DES:!MD5:!PSK:!RC4;
    ssl_prefer_server_ciphers on;

}
This last server block will perform the actual proxying. It will listen on www.yeetpc.com port 443 and proxy requests to localhost port 8081. To do this, we can add a location block within this server block. Within the location block, we set proxy headers which NginX forwards to the backend, and we add the proxy pass and proxy redirect with the ip address and port of the backend server. The next few lines are optional, but I recommend using them because they heighten the security of your server. These lines enable HSTS, clickjacking protection, XSS protection, and disable content and mime sniffing. Finally, we can add a line which adds the trailing slash to all URLs.
server {

    listen 443;
    server_name www.yeetpc.com;

    SSL Configuration

    ssl_certificate /etc/letsencrypt/live/yeetpc.com/fullchain.pem; # managed by Certbot
    ssl_certificate_key /etc/letsencrypt/live/yeetpc.com/privkey.pem; # managed by Certbot
    ssl on;
    ssl_session_cache  builtin:1000  shared:SSL:10m;
    ssl_protocols  TLSv1 TLSv1.1 TLSv1.2;
    ssl_ciphers HIGH:!aNULL:!eNULL:!EXPORT:!CAMELLIA:!DES:!MD5:!PSK:!RC4;
    ssl_prefer_server_ciphers on;

    # Set the access log location

    access_log            /var/log/nginx/yeetpc.access.log;

    location / {

      # Set the proxy headers

      proxy_set_header        Host $host;
      proxy_set_header        X-Real-IP $remote_addr;
      proxy_set_header        X-Forwarded-For $proxy_add_x_forwarded_for;
      proxy_set_header        X-Forwarded-Proto $scheme;

      # Configure which address the request is proxied to

      proxy_pass          http://localhost:8081/;
      proxy_read_timeout  90;
      proxy_redirect      http://localhost:8081 https://www.yeetpc.com;

      # Security headers
      add_header Strict-Transport-Security "max-age=31536000; includeSubDomains; preload";
      add_header X-Frame-Options DENY;
      add_header X-Content-Type-Options nosniff;
      add_header X-XSS-Protection "1; mode=block";
      add_header Referrer-Policy "origin";

      # Add the trailing slash
      rewrite ^([^.]*[^/])$ $1/ permanent;
    }

}
After adding these lines, save the file and close your editor.
There's one more step before we can use this config: symlinking it to the sites-enabled directory (which NginX reads). To do this, type the following command:
# sudo ln -s /etc/nginx/sites-available/reverse-proxy.conf /etc/nginx/sites-enabled/reverse-proxy.conf
Adding Another Config File
The next config file will be slightly different, because it's for a subdomain. Using this config, we'll proxy traffic from the commento subdomain to a backend server at 192.168.0.230 port 80.
To start making our config, we can create another file in the /etc/nginx/sites-available/ directory called SUBDOMAIN.conf (replace SUBDOMAIN with the proper subdomain name, in this case commento).
The first server block we add will redirect traffic from http on port 80 to https on port 443.
server {
    listen 80;
    server_name commento.yeetpc.com;
    return 301 https://$host$request_uri;
}
This next server block will perform the actual proxying. It will listen on commento.yeetpc.com port 443 and proxy requests to 192.168.0.230 port 80. To do this, we’ll add a location block inside the server block. Within the location block, we set proxy headers which NginX forwards to the backend, and we add the proxy pass and proxy redirect with the ip address and port of the backend server. Again, the security headers at the bottom are optional, but they will greatly improve the security of your server, so I recommend that you add them.
server {

    listen 443;
    server_name commento.yeetpc.com;

    # SSL configuration

    ssl_certificate /etc/letsencrypt/live/commento.yeetpc.com/fullchain.pem; # managed by Certbot
    ssl_certificate_key /etc/letsencrypt/live/commento.yeetpc.com/privkey.pem; # managed by Certbot
    ssl on;
    ssl_session_cache  builtin:1000  shared:SSL:10m;
    ssl_protocols  TLSv1 TLSv1.1 TLSv1.2;
    ssl_ciphers HIGH:!aNULL:!eNULL:!EXPORT:!CAMELLIA:!DES:!MD5:!PSK:!RC4;
    ssl_prefer_server_ciphers on;

    # Set the access log location

    access_log            /var/log/nginx/commento.access.log;

    location / {

    # Set the proxy headers

      proxy_set_header        Host $host;
      proxy_set_header        X-Real-IP $remote_addr;
      proxy_set_header        X-Forwarded-For $proxy_add_x_forwarded_for;
      proxy_set_header        X-Forwarded-Proto $scheme;

      # Configure which address the request is proxied to

      proxy_pass          http://192.168.0.230:80;
      proxy_read_timeout  90;
      proxy_redirect      http://192.168.0.230:80 https://commento.yeetpc.com;

      # Set the security headers

      add_header Strict-Transport-Security "max-age=31536000; includeSubDomains; preload"; #HSTS
      add_header X-Frame-Options DENY; #Prevents clickjacking
      add_header X-Content-Type-Options nosniff; #Prevents mime sniffing
      add_header X-XSS-Protection "1; mode=block"; #Prevents cross-site scripting attacks
      add_header Referrer-Policy "origin"; #Idk what this actually does";
    }

}
After adding these two server blocks, save the file and exit out of your text editor.
Finally, symlink the file to sites-enabled/ using the command below:
sudo ln -s /etc/nginx/sites-available/SUBDOMAIN.conf /etc/nginx/sites-enabled/SUBDOMAIN.conf
To add any additional subdomains, simply copy the previous config file and replace the server_name with the new subdomain, along with the backend's ip address and port. Then symlink the new file to the sites-enabled directory.
Temporary SSL Certificates
Before we can restart NginX and put our new configuration into action, we have to create a temporary SSL certificate. If you try to start NginX without a temporary cert, it'll complain about not finding the certificate file.
To create a temporary certificate, type the following command:
# openssl req -newkey rsa:2048 -nodes -keyout key.pem -x509 -days 365 -out certificate.pem
Then change these lines in the config file:
ssl_certificate /etc/letsencrypt/live/yeetpc.com/fullchain.pem; # managed by Certbot
ssl_certificate_key /etc/letsencrypt/live/yeetpc.com/privkey.pem; # managed by Certbot
to this:
ssl_certificate /home/user/certificate.pem; # managed by Certbot
ssl_certificate_key /home/user/key.pem; # managed by Certbot
Make sure to replace "user" with your server username.
Finally, restart NginX using the following command:
# systemctl restart nginx
Obtaining Let's Encrypt SSL Certificates
Now that Nginx has restarted with the new configuration, we can obtain SSL certificates from Let's Encrypt, a certificate authority that provides free certificates. To obtain a Let's Encrypt certificate, we can use Certbot. To install Certbot on Ubuntu Server, type the following commands:
# apt update
# apt install python3-certbot-nginx
Then, to obtain a certificate for the www and non-www domains, type the following command, replacing yeetpc.com with your main domain name:
# certbot --nginx -d yeetpc.com -d www.yeetpc.com
Certbot will ask for some information, including your email address, agreement to the Terms of Service, and whether or not you want to subscribe to their newsletter. Then, certbot will obtain your certificate.
To obtain a certificate for any additional subdomains, type the following command, replacing sub.domain.com with the proper subdomain address:
# certbot --nginx -d sub.domain.com
Once you've obtained the certificates, restart NginX with this command:
# systemctl restart nginx
Now, visit each of your subdomains and ensure that they are accessible over https.
Cron Job to Renew SSL Certificates
The last thing we should do is to set up auto-renewal of SSL certificates using cron. To do this, open the crontab for editing using the command shown below:
# crontab -e
Then add the following line to the crontab to automatically try to renew the certificates at 1:00am every day.
0 1 * * * certbot renew
Conclusion
In conclusion, a reverse proxy allows you to easily host multiple sites on the same ip address without exposing unnecessary ports. If you enjoyed this article, be sure to check out some of my other articles about my ThinkPad X220 Tablet, using an iMac G5 in 2020, and hardening a Linux server. Or check out the accompanying video. If you have any questions or comments, be sure to let me know down below. Thanks for reading!